Sunday, 28 August 2011

Sunflower Browine Pops!

This Sunflower Pop is too cute for so many occassions.  I found this at the  Munchkinmunchies Website.


Supplies:1 box of brownie mix (Prepare as directed. Cool completely)
8 oz. of prepared cream cheese frosting
14 oz. bag of chocolate candy melts 
lollipop sticks (2-3 dozen)
block of styrofoam (to hold drying pops)
chocolate sprinkles
yellow m&m candies~12 per pop
Lime green royal icing

Directions:
1. Put prepared brownies in a large bowl, and break up into small crumbs with your hands(clean of course). 
2. Add the frosting and mix well, either with your hands, or a sturdy large spoon. If you need a bit more frosting to hold it together, go ahead, but not too much.
3. Roll the mixture into balls (about 1 1/2 inches) and place on wax paper-lined cookie sheet. Cover and chill in the refrigerator for a few hours, or place in freezer for 15 minutes. You want them chilled, but not frozen. (I actually froze my unfrosted brownie balls in an airtight container and thawed them when I was ready to make them into pops, days later.)
4. Place the candy melts in a small, deep ( big enough to hold all the melted candy, but deep enough to dip the pops) microwave-safe bowl and follow the directions on the bag for melting.
5. Dip a lollipop stick about 1/2- inch into the candy melt and then insert it directly into the brownie ball, no more than halfway in(this helps the pop adhere to the stick).
6. Holding it by the stick, dip the brownie ball into the melted coating until it's completely covered (use a spoon if need be), all the way to where the brownie meets the stick. 
7. If there's too much coating on your pop, hold the brownie pop in one hand and use the other hand to gently tap the first wrist, letting the excess drip back into the bowl. Try to make the coating even all the way around.
8. Add chocolate sprinkles to the front side of the pop (while chocolate is still wet), which would be the "face" of the flower.
9. Quickly, but carefully, while chocolate is still wet, add the m&m's around the perimeter of the pop (look at top photo) to form the "petals". If the chocolate dries, slightly dip each  m&m into the melted chocolate and then onto the pop. Hold it in place until it adheres~about 15 seconds.
10. Stick the brownie pop into a block of styrofoam until completely dry.
11.. Repeat with each brownie pop and let them dry completely.
12. When dry and sturdy, add the green royal icing decorations with a #4 tip. Let dry completely.

ENJOY!

Saturday, 20 August 2011

Skillet-Baked Chocolate Chip Cookie

I recently ordered the Pizza 73 4-pack.  For desert, we picked the chocolate cookie.  I thought it was such a great idea that I search the net to try and find a recipet with the same concept and this is what I found...


ENJOY!

Tuesday, 16 August 2011

R is For Rose Basket Cupcake

R is For Rose Basket Cupcake


Ingredients
  • 1 cupcake
  • Chocolate frosting
  • Green-tinted coconut
  • 5 candy or frosting roses
  • 3 strands red whip licorice
Instructions
  1. Unwrap the cupcake and frost in a basket-weave pattern using a basket-weave tip, as in the inset photo. (An easier alternative is simply to pipe a decorative edge around the top of the cupcake.)
  2. Add the coconut grass and the candy roses. Braid the licorice for a decorative handle.
  3. You can also make your own roses with a rose tip and pink frosting.

ENJOY!!

P is for.....Popcorn Cupcakes

Popcorn Cupcakes


Ingredients
  • 1 baked cupcake
  • White icing
  • 40 mini marshmallows (white or pastel yellow and white)
  • Yellow food coloring (optional)
  • Clean paintbrush
  • Scissors
  • White construction paper
  • Blue and red markers
Instructions
  1. Frost the cupcake with white icing. To create each piece of "popcorn," cut one mini marshmallow in half and squish the two pieces back together into a whole mini marshmallow, pinching firmly. Pile the finished popcorn onto the frosted cupcake.
  2. For a buttery look, either dilute a drop of yellow food coloring in water and brush it on with a clean paintbrush or mix pastel yellow marshmallows in with the white.
  3. To make the band, cut a strip of construction paper about 1 1/4 inches by 8 inches, or to fit your cupcake, and decorate as shown.
  4. If you're creating many cupcakes, design just one band and color photocopy it. Wrap the band around the cupcake and secure with tape.

ENJOY!

Now "C" is for......Cacti-Cakes

Cacti Cakes


Ingredients
  • Cupcakes
  • White frosting
  • Brown sugar or graham cracker crumbs
  • Green Jujyfruits
  • Red Jujyfruits
  • Toothpicks
Instructions
  1. Coat your favorite cupcakes with white frosting, then dip them in "sand" (brown sugar or graham cracker crumbs).
  2. Skewer green Jujyfruits onto toothpicks, leaving a bit of each pick exposed. Use another toothpick, cut in half, to add a red Jujyfruits flower atop one of the arms, then stick a cactus into each cupcake.

ENJOY!

Back to School.....A Is for Apple Cupcake

A is for Apple Cupcake


Ingredients
  • 1 cupcake
  • Red frosting
  • 1 mini pretzel stick
  • Melted chocolate
  • 1 green gumdrop leaf
  • 1 gummy worm
Instructions
  1. Unwrap the cupcake and ice it with the red frosting.
  2. Dip the pretzel stick in melted chocolate, allow it to harden, then insert it for the stem.
  3. Add the gumdrop leaf (or make one with green frosting and a leaf tip). Cut a small "bite" out of the cupcake and insert the worm or just half of one!

Monday, 15 August 2011

Soft-Serve Swirl Cupcakes

 
Step by step instructions from start to finish.
Soft-serve swirl cupcakes
  Ingredients:

Instructions:

Step 1

Bake and cool cupcakes.

Step 2

Pipe tip 1M swirl on cupcake tops. Sprinkle with nonpareils.

Step 3

Position cherry sprinkle; insert stick candy.

Buttercream Icing

Buttercream Icing
 
Follow our instructions to make it the ideal consistency you need.

Ingredients:

  • 1/2 cup solid vegetable shortening
  • 1/2 cup (1 stick) butter or margarine softened
  • 1 teaspoon clear vanilla extract
  • 4 cups sifted confectioners' sugar (approximately 1 lb.)
  • 2 tablespoons milk

Makes:

About 3 cups of icing.

Instructions:

Step 1

In large bowl, cream shortening and butter with electric mixer. Add vanilla. Gradually add sugar, one cup at a time, beating well on medium speed. Scrape sides and bottom of bowl often. When all sugar has been mixed in, icing will appear dry. Add milk and beat at medium speed until light and fluffy. Keep bowl covered with a damp cloth until ready to use.

Step 2

For best results, keep icing bowl in refrigerator when not in use. Refrigerated in an airtight container, this icing can be stored 2 weeks. Rewhip before using.

Step 3

For thin (spreading) consistency icing, add 2 tablespoons light corn syrup, water or milk.

Step 4

For Pure White Icing (stiff consistency), omit butter; substitute an additional 1/2 cup shortening for butter and add 1/2 teaspoon No-Color Butter Flavor. Add up to 4 tablespoons light corn syrup, water or milk to thin for icing cakes.

1M Swirl

1M Swirl


Here is another quick way to decorate your cupcakes or cakes. It just takes minutes to pipe a fancy iced swirl and add colorful sprinkles.

Ingredients:

Instructions:

Step 1

Hold Open Star Decorating Tip 1M approximately 1/4" above cupcake top at a 90° angle to cupcake surface. Pipe a spiral of icing, beginning at the outer edge and working inward.

Step 2

Stop pressure; pull tip away.

Step 3

Pipe a second spiral, smaller (not as wide) on top. End spiral at center. Stop pressure; pull tip straight up and away.

ENJOY!

Thursday, 11 August 2011

Starbucks Frozen Frappuccino

Starbucks logoStarbucks Frozen Frappuccino

  • Time 20 minutes
  • Serves 2

Ingredients

  • 3/4 cup double-strength coffee, cold
  • 3 tablespoons granulated sugar
  • 1 cup low-fat milk
  • 2 cups ice
  • Caramel topping, 3 Tbs
  • Whipped Cream
  • Hersheys Chocolate Syrup 3 tbs

How to make it

  • Make double-strength coffee by brewing with twice the coffee required by your coffee maker: That should be 2 tablespoons of ground coffee per each cup of coffee. Chill before using.
  • To make drink, combine all ingredients in a blender and blend on high speed until ice is crushed and drink is smooth. Pour into two 16-ounce glasses, and serve with a straw.
  • CARAMEL Version:
  • For this version, add 3 tablespoons of caramel topping to the original recipe and prepare as described. Top each glass with whipped cream and drizzle additional caramel over the whipped cream.
  • MOCHA Version:
  • For this version, add 3 tablespoons Hershey's chocolate syrup to the original recipe and prepare as described. Top each glass with whipped cream, if desired.

ENJOY!

Friday, 5 August 2011

Strawberry Lemonade Popsicles Recipe

Strawberry Lemonade Popsicles

As soon as I saw this recipe in my Inbox from Mrs. January, I ran out to the grocery store and bought some frozen strawberries.  This is a must try! 


Stuff You'll Need:

- 3 Heaping Cups Of Fresh or Frozen Strawberries
- 3 Cups Lemonade
- 2 Tablespoons Sugar
- 1/4 Teaspoon Vanilla


Instructions:
1. Add all of your ingredients to a blender and blend until smooth.
2. If desired, strain out the seeds.
3. Pour into your popsicle molds and freeze for 20 minutes.
4. After 20 minutes, add your popsicle sticks and freeze for another 4 hours – overnight.
Serves Around 10

ENJOY!

Monday, 1 August 2011

Watermelon Pop


Ingredients
  • 1 cup strawberry sorbet
  • 2 teaspoons mini chocolate chips
  • 3 tablespoons water
  • 1/2 cup lemon sorbet
  • 2 drops green food coloring
  • wedge-shaped popsicle molds
  • popsicle sticks
Instructions
  1. To make a batch, mash together 1 cup strawberry sorbet, 2 teaspoons mini chocolate chips, and 2 tablespoons water in a small bowl.
  2. Put the the mixture into wedge-shaped popsicle molds (we used six 2-ounce molds), filling each about two-thirds full.*
  3. Spoon a thin, even layer of lemon sorbet on top. In a small bowl, stir together 1/2 cup lemon sorbet, 2 drops green food coloring, and 1 tablespoon water.
  4. Spoon a layer into each mold and insert a popsicle stick. Freeze the pops for at least four hours.
Tips:
* Here's an easy way to fill the molds: mix these ingredients in a ziplock bag, snip a corner of the bag, then pipe in the mixture.


Whatta Melon Pop!

Flip Flop Cake

I'm a huge fan of anything to do with summer and the beach.  It just seems to bring happiness all around!

Flip-Flops Cake


Recipe Ingredients

    • 1 box (18.25 oz) yellow cake mix
    • 1 box (3.4 oz) instant vanilla pudding mix
    • 1 cup water
    • 4 eggs
    • 1/3 cup oil
    • 2 tubs (16 oz each) white frosting
    • Green and pink gel or paste food color
    • 8 rainbow and 4 red sour belts candies
    • You'll also need: graham cracker crumbs; shell-shaped cookies and/or chocolates; gummy fish and starfish

Recipe Preparation

    1. Heat oven to 350ºF. You'll need a 13 x 9-in. baking pan coated with nonstick spray, bottom lined with wax paper and sprayed. You'll also need a sturdy serving surface about 20 x 16 in.
    2. Prepare cake mix as directed for yellow pound cake, using pudding, water, eggs and oil. Pour batter into pan. Bake 35 to 40 minutes, until pick inserted into center comes out clean. Cool 10 minutes on wire rack. Remove from pan, peel off paper and cool completely.
    3. With long serrated knife, trim top of cake horizontally to make level. Cut out 2 flip-flop shapes, each about 10 1/2 x 5 in. Place on serving surface.
    4. Tint 1/2 cup frosting light green. Transfer to small freezer ziptop bag with small hole snipped in one corner. Tint remaining frosting pink. Spread tops and sides of cakes with pink frosting.
    5. Cut each rainbow sour belt lengthwise into two strips and arrange on cakes to make stripes, cutting as necessary to fit. Pipe decorative border of green frosting around top edges of cakes.
    6. For straps, cut two 6 1/2-in. pieces from red sour belts. Pinch two ends together on diagonal to attach. Trim remaining ends to round; place on top of one cake. Repeat to make strap for remaining cake.
    7. Sprinkle serving surface with graham cracker crumbs. If desired, decorate with shell-shaped cookies and chocolates, gummy fish and starfish.Each Flip-Flop measures 10 1/2 x 5 in.
Plan Ahead: You can bake cake up to 3 days ahead, wrap airtight and refrigerate. Frost and decorate up to 1 day ahead.
Tips for perfect party cakes:
    1.  For large serving surfaces, you can use wax or parchment paper to cover a sheet of hard plastic foam (available at crafts and art supply stores), doubled for extra strength if necessary, or a large cutting board.
    2.  Bake cakes up to 3 days ahead, cool and wrap airtight. Leave the decorating for another day.
    3.  If a cake requires two of the same size pan and you only have one, divide batter in half and bake one pan, leaving remaining batter covered at room temperature. Wash, dry and prepare pan. Bake remaining batter.

Sunday, 31 July 2011

Birthday Cake Brownie Pops

These little pieces are the latest thing.  In my opinion, they're little pieces of heaven. 


My daughter-in-law has a birthday coming up:)  She's a big fan of my brownie pops, so I wanted to make her some special brownie pops to help her celebrate. 

When I saw these adorable mini cake-cake pops, I knew I had hit on the perfect pop! Didn't Strawberry-Chic do a fabulous job?
I basically followed her procedure to shape them, and the mini cakes turned out just as I imagined, especially with the sprinkles and candles on top:)

The ingredients and directions are the same as they are forbrownie pops, except for shaping them into tiny cakes:)

To make birthday cake brownie pops (I made these late at night, last minute, and didn't get any step-by-step photos):
Gather a ball of baked brownie mixture and make it into a small patty.  Use a 1.5-inch round cutter (I used a biscuit cutter) and cut out a round mini cake. Place it on a wax paper lined baking sheet. Insert a lollipop stick (the tip of the stick should have some melted candy on it to help it stay put) into the middle of each pop  Once they are all prepared, place in the freezer until firm.  Working with one at a time, take from freezer and dip each cake into the melted candy melts (melt as pkg. directs) and let excess drip off (I also used a small offset spatula to smooth the top and around the entire pop if it needed it).  Shake the sprinkles on the top of the mini cake and place the candle* before the candy coating dries. You may need to add some candy melt to the bottom of the candle before placing it on the pop. Prepare some royal icing to decorate the cakes.  I used royal icing so that I could individually package these pops without a mess(after the royal icing dried).
* For candles I used a sharp knife to cut regular sized birthday candles down to size.

You will end up with some cute little birthday cakes of your own~brownie pop style!
 
 
ENJOY!


Hedgehog Donut Holes

I can't get over how great of an idea this is and so easy too!  I found this idea at http://phar-ma.com/hedgehog-donut-holes and it was soooo easy to make! 
Ok.....I love hedgehogs! There, I said it. Aren't they the cutest?! I got inspired by some cinnamon donut holes and thought, "wouldn't these make the most adorable hedgehogs?" I know....I'm slightly obsessed :)
Now time to add the face...tip: use a toothpick to make "pilot holes" then push sprinkles in.
Seriously....the cutest!
ENJOY!

Monday, 18 July 2011

Fish Bowl Gelatin


ENJOY!

Butterfly Cupcakes

Too cute not to share!!


ENJOY!

Chocolate-Ginger Bathing Beauties

I ABSOLUTELY LOVE this idea!  Martha Stewart rocks!  This idea is going in my books FOREVER!


Chocolate-Ginger Bathing Beauties

Don't let these gingerbread people lie out in the sun too long -- their chocolate ice-cream filling will melt. The cookies are decorated with candy-coated chocolates affixed with melted chocolate to create bikinis and swim trunks. Napkins serve as beach towels, shaded by paper parasols anchored (with marzipan) in ring candies.
ENJOY!

How to Make Fortune Cookies

Every wonder how to make fortune cookies, here you go.....
---------------------------------------------------------------------------------------------------
Have you ever wanted to make the kind of fortune cookies that you find in your local Chinese restaurant? Then follow the recipe and directions on this page to make treats for yourself, family or friends. Begin by gathering together all your ingredients and equipment. You can download and print fortune cookie fortunes for inside your cookies and cut them out, or you can make your own. Preheat your oven to 300 degrees F (150 degrees C) and grease the cookie sheets. It is better to have 2 cookie sheets so that you can have a batch of cookies baking in the oven while you are working on forming the ones that are newly cooked.

Ingredients for Gourmet Fortune Cookie Recipe

  • 2 eggs
  • 1/2 teaspoon of vanilla extract
  • 1/2 teaspoon of almond extract
  • 3 tablespoons of vegetable oil
  • 8 tablespoons of white flour
  • 1 1/2 teaspoons of cornstarch
  • 1/4 teaspoon of salt
  • 8 tablespoons of sugar
  • 4 teaspoons of water

Equipment to Make Fortune Cookies Recipe

  • 2 mixing bowls
  • Balloon whisk
  • Electric beater
  • Teaspoon measure
  • Tablespoon measure
  • 2 Cookie sheets
  • Muffin tray
  • Print Fortune Cookie Sayings
  • Scissors
Beat the Eggs

Beat

Separate eggs as you will only be using the white in this recipe.
Place the egg white in a bowl and beat with balloon whisk.
Add the vanilla and almond extracts and the vegetable oil and whisk again until the mixture becomes a little foamy.
Mix until well combined

Beat Again

Place the flour, cornstarch, salt and sugar into a mixing bowl and stir in the water.
You may find it easier to do use an electric beater to get this mixture fully combined and resembles a thick paste.

Mix the egg and flour mixtures together

Combine

Now take your egg mixture and add small amounts to the flour mixture and combine together using electric beaters.
Continue adding egg mixture until there is none left and you have a smooth batter, runny batter.
Drop small amounts of batter onto a baking sheet

Arrange

Place tablespoons of batter onto a greased cookie sheet making sure to space each one about 2 inches apart. Tilt the cookie sheet back and forth and from side to side so that the batter spreads out evenly into a fairly large circle.
Don't worry too much about trying to get perfect circles as the heat from the oven will help to spread the batter before they start to cook. (You may want to start by only baking a couple of cookies before you become familiar with the process).
Bake for 10 - 15 minutes, or until the edges of the cookies start to turn a golden brown color and they start to come away from the cookie sheet.

Remove from the oven

Remove

Remove the cookie tray from the oven, remove a cookie using a spatula and place it on the palm of your hand (use caution as the cookies will be very hot so gloves should be used to protect your hands).
You will need to work quickly! Place a pre-cut fortune on to the middle of the cookie.
Fold the flat cookie into the traditional fortune cookie shape

Fold

Now form the cookie shape by folding the cookie in half and then pulling the 2 outer points together.
Place the folded cookie into one of the cavities on your muffin tray and leave to cool.
As the cookie cools it will harden and keep the classic fortune cookie shape.

Finished!

Now that you have your finished making your fortune cookies, you can share them with your friends and family.
Variations would be to use food coloring to give your cookies a seasonal touch: green for Halloween and red for the winter holiday season.
Give your fortune cookies a gourmet flavor by dipping them in tempered chocolate, or decorate with sprinkles or other edible decorations.

ENJOY!

Thursday, 14 July 2011

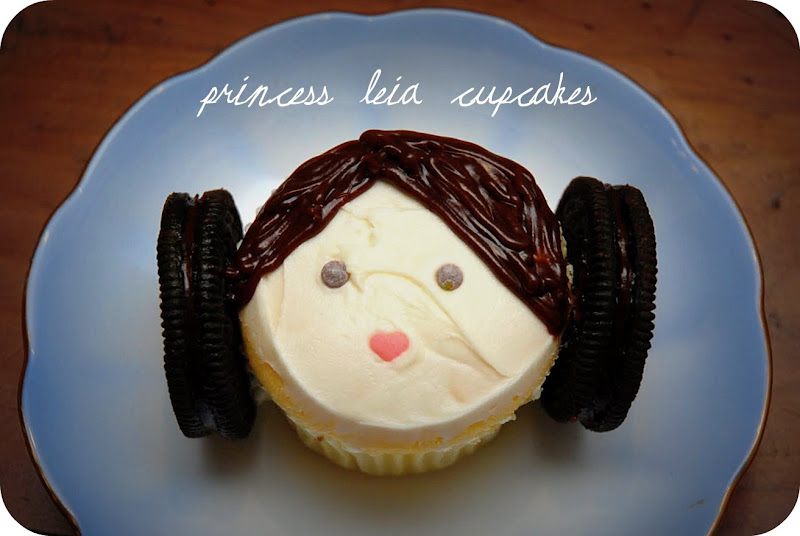
Princess Leia Cupcakes

I can't get over on how adorable these cupcakes are!  Love it!

15167594294.jpg


I have this pic at:  http://ab.lattimore.id.au/2011/07/10/36/

ENJOY!