Sunday 31 July 2011

Birthday Cake Brownie Pops

These little pieces are the latest thing.  In my opinion, they're little pieces of heaven. 


My daughter-in-law has a birthday coming up:)  She's a big fan of my brownie pops, so I wanted to make her some special brownie pops to help her celebrate. 

When I saw these adorable mini cake-cake pops, I knew I had hit on the perfect pop! Didn't Strawberry-Chic do a fabulous job?
I basically followed her procedure to shape them, and the mini cakes turned out just as I imagined, especially with the sprinkles and candles on top:)

The ingredients and directions are the same as they are forbrownie pops, except for shaping them into tiny cakes:)

To make birthday cake brownie pops (I made these late at night, last minute, and didn't get any step-by-step photos):
Gather a ball of baked brownie mixture and make it into a small patty.  Use a 1.5-inch round cutter (I used a biscuit cutter) and cut out a round mini cake. Place it on a wax paper lined baking sheet. Insert a lollipop stick (the tip of the stick should have some melted candy on it to help it stay put) into the middle of each pop  Once they are all prepared, place in the freezer until firm.  Working with one at a time, take from freezer and dip each cake into the melted candy melts (melt as pkg. directs) and let excess drip off (I also used a small offset spatula to smooth the top and around the entire pop if it needed it).  Shake the sprinkles on the top of the mini cake and place the candle* before the candy coating dries. You may need to add some candy melt to the bottom of the candle before placing it on the pop. Prepare some royal icing to decorate the cakes.  I used royal icing so that I could individually package these pops without a mess(after the royal icing dried).
* For candles I used a sharp knife to cut regular sized birthday candles down to size.

You will end up with some cute little birthday cakes of your own~brownie pop style!
 
 
ENJOY!


Hedgehog Donut Holes

I can't get over how great of an idea this is and so easy too!  I found this idea at http://phar-ma.com/hedgehog-donut-holes and it was soooo easy to make! 
Ok.....I love hedgehogs! There, I said it. Aren't they the cutest?! I got inspired by some cinnamon donut holes and thought, "wouldn't these make the most adorable hedgehogs?" I know....I'm slightly obsessed :)
Now time to add the face...tip: use a toothpick to make "pilot holes" then push sprinkles in.
Seriously....the cutest!
ENJOY!

Monday 18 July 2011

Fish Bowl Gelatin


ENJOY!

Butterfly Cupcakes

Too cute not to share!!


ENJOY!

Chocolate-Ginger Bathing Beauties

I ABSOLUTELY LOVE this idea!  Martha Stewart rocks!  This idea is going in my books FOREVER!


Chocolate-Ginger Bathing Beauties

Don't let these gingerbread people lie out in the sun too long -- their chocolate ice-cream filling will melt. The cookies are decorated with candy-coated chocolates affixed with melted chocolate to create bikinis and swim trunks. Napkins serve as beach towels, shaded by paper parasols anchored (with marzipan) in ring candies.
ENJOY!

How to Make Fortune Cookies

Every wonder how to make fortune cookies, here you go.....
---------------------------------------------------------------------------------------------------
Have you ever wanted to make the kind of fortune cookies that you find in your local Chinese restaurant? Then follow the recipe and directions on this page to make treats for yourself, family or friends. Begin by gathering together all your ingredients and equipment. You can download and print fortune cookie fortunes for inside your cookies and cut them out, or you can make your own. Preheat your oven to 300 degrees F (150 degrees C) and grease the cookie sheets. It is better to have 2 cookie sheets so that you can have a batch of cookies baking in the oven while you are working on forming the ones that are newly cooked.

Ingredients for Gourmet Fortune Cookie Recipe

  • 2 eggs
  • 1/2 teaspoon of vanilla extract
  • 1/2 teaspoon of almond extract
  • 3 tablespoons of vegetable oil
  • 8 tablespoons of white flour
  • 1 1/2 teaspoons of cornstarch
  • 1/4 teaspoon of salt
  • 8 tablespoons of sugar
  • 4 teaspoons of water

Equipment to Make Fortune Cookies Recipe

  • 2 mixing bowls
  • Balloon whisk
  • Electric beater
  • Teaspoon measure
  • Tablespoon measure
  • 2 Cookie sheets
  • Muffin tray
  • Print Fortune Cookie Sayings
  • Scissors
Beat the Eggs

Beat

Separate eggs as you will only be using the white in this recipe.
Place the egg white in a bowl and beat with balloon whisk.
Add the vanilla and almond extracts and the vegetable oil and whisk again until the mixture becomes a little foamy.
Mix until well combined

Beat Again

Place the flour, cornstarch, salt and sugar into a mixing bowl and stir in the water.
You may find it easier to do use an electric beater to get this mixture fully combined and resembles a thick paste.

Mix the egg and flour mixtures together

Combine

Now take your egg mixture and add small amounts to the flour mixture and combine together using electric beaters.
Continue adding egg mixture until there is none left and you have a smooth batter, runny batter.
Drop small amounts of batter onto a baking sheet

Arrange

Place tablespoons of batter onto a greased cookie sheet making sure to space each one about 2 inches apart. Tilt the cookie sheet back and forth and from side to side so that the batter spreads out evenly into a fairly large circle.
Don't worry too much about trying to get perfect circles as the heat from the oven will help to spread the batter before they start to cook. (You may want to start by only baking a couple of cookies before you become familiar with the process).
Bake for 10 - 15 minutes, or until the edges of the cookies start to turn a golden brown color and they start to come away from the cookie sheet.

Remove from the oven

Remove

Remove the cookie tray from the oven, remove a cookie using a spatula and place it on the palm of your hand (use caution as the cookies will be very hot so gloves should be used to protect your hands).
You will need to work quickly! Place a pre-cut fortune on to the middle of the cookie.
Fold the flat cookie into the traditional fortune cookie shape

Fold

Now form the cookie shape by folding the cookie in half and then pulling the 2 outer points together.
Place the folded cookie into one of the cavities on your muffin tray and leave to cool.
As the cookie cools it will harden and keep the classic fortune cookie shape.

Finished!

Now that you have your finished making your fortune cookies, you can share them with your friends and family.
Variations would be to use food coloring to give your cookies a seasonal touch: green for Halloween and red for the winter holiday season.
Give your fortune cookies a gourmet flavor by dipping them in tempered chocolate, or decorate with sprinkles or other edible decorations.

ENJOY!

Thursday 14 July 2011

Princess Leia Cupcakes

I can't get over on how adorable these cupcakes are!  Love it!

15167594294.jpg


I have this pic at:  http://ab.lattimore.id.au/2011/07/10/36/

ENJOY!

Snowcone Cupcake

I have fully and completely fallen in love with this cupcake idea!


Learn to make snow cone cupcakes HERE at Celebrations.com.

ENJOY!

Smoothie Colada

Smoothie Colada


Are you lactose intolerant or just LOVE soya milk?  Here's the perfect smoothie recipe:


Ingredients
1 cup250 mlSilk Vanilla, Silk Vanilla Light or Silk Plus Omega-3 DHA
2 tablespoons30 mlCoconut cream
3/4 cup175 mlPineapple juice
1/2 cup125 mlPineapple chunks, frozen
6Ice cubes

Preparation

Combine ingredients in blender and blend until smooth. Sip while envisioning the beach.

ENJOY!

Wednesday 13 July 2011

Treasure Chesst Cake

This is toooo adorable not to share! 

Treasure Chest Cake

Your swashbucklers can leave the Pirate Party with quite a haul, such as gummy fish, temporary tattoos, chocolate coins or candy jewelry. They can dig these treasures out of the Treasure Chest Cake at the end of the hunt (just be sure everyone gets an even number of prizes).


Ingredients
  • 1 baked 13- x 9- x 2-inch cake
  • 6 cups chocolate frosting
  • Edible treasures, such as chocolate coins, Rolo candies, chocolate almond kisses or Necco Wafers
  • Red Fruit by the Foot
  • Mini jawbreakers
  • Candy jewels, such as candy necklaces and rock candy
Instructions
  1. Treasure Chest Cake Step 1 Cut a section approximately 2-inches wide in the center of the cake. The two remaining 5 1/2- x 9- x 2-inch rectangular pieces will form the bottom and top of the chest.
  2. Slice the 2-inch section on an angle to form two long triangular wedges. Place the wedges on the bottom half of the chest, about an inch apart. Both wedges should face the same direction (tall end toward the front of the cake) as they will support the top of the treasure chest and keep it propped open. Then frost the bottom half of cake, including the wedges.
  3. To add further support for the top of the chest, stand a few large gold coins under the lid.
  4. With the "hinged" end (left side of photo) at the back, place the top of the chest on the bottom and frost.
  5. Wrap the fruit leather straps around the chest and press mini jawbreaker "nails" into the frosting alongside the straps. Fill the chest and the surrounding area with edible treasures and jewels.


ENJOY!

Monday 11 July 2011

Towering Sand Castle Cake

from Familyfun

Towering Sand Castle Cake

This crumb-covered cake is "shore" to make a splash at any beach- or sea-themed birthday bash. Scatter some candy seashells and rocks around the base and prepare for a wave of compliments.


Ingredients
  • 8-inch round yellow cake
  • 9-inch square yellow cake
  • 2 (12-ounce) cans whipped vanilla frosting
  • Vanilla wafers, 12-ounce box
  • 4 jumbo ice-cream cups
  • 2 small ice-cream cups
  • 6 sugar cones
  • Graham cracker sticks (we used Nabisco Honey Maid Grahams Honey Sticks)
  • Candy seashells and rocks
Instructions
  1. Towering Sand Castle Cake - Step 1 Use a long serrated knife to trim the top of the round cake flat, if needed. Cut a 5 1/2-inch and a 3 1/2-inch circle from the square cake, then stack all three pieces, spreading vanilla frosting between the layers. Frost the stack.
  2. Use a rolling pin or food processor to crumble the wafers. With your hands, press the crumbs into the frosting, completely coating the cake. Spread frosting on the bottom of each ice-cream cup, then set them around the cake. With a serrated knife, carefully trim 1 1/2 inches from the top of 2 of the sugar cones. Set all 6 cones into the cups to complete the turrets, spreading a bit of frosting around the rims to hold them if needed.
  3. Press 2 graham cracker-stick doors into the middle cake layer and rim the rest of the cake with graham cracker-stick halves. Sprinkle the remaining crumbs around the base and add a scattering of candy seashells and rocks. Serves 12.

Sunday 10 July 2011

Free Tenderflake Stencils for Pies

Summer Stencils
Free summer stencils to personalize your summer pies!

Mini Cake - "Cake Pops"


Cake pops are one of my favorite new inventions. I love that I can take the cake pop batter and manipulate it into pretty much whatever shape I want, depending on the occasion of course. Have you seen the Bakerella website, if you haven't you must because the possibilities are seriously endless for cake pop designs! I'm finding it hard to make something that has already been done!

Well, I made these mini cake "cake pops" for the "Let Them Eat Cake" party I posted a few weeks ago. I thought they turned out pretty cute and the girls loved them!


If you would like to learn how to make these lovely little treats click below...

Don't worry...the instructions for these cake pops are a lot more simple then my Spring Flower Cake Pops, I promise!


Mini Cake "Cake Pops"
You will need...
1 box chocolate cake mix (cook as directed on box for 13 X 9 cake)
1 can cream cheese buttercream frosting (16 oz.) or approx. 2 cups

White chocolate melts (can purchase at Walmart or craft stores)
lollipop sticks (can purchase at craft stores)
A small amount of buttercream frosting to decorate mini cakes
Frosting bag, coupler, and #2 or #3 frosting tip
1" diameter round cookie cutter
Wax paper
Shortening
Styrofoam square (can purchase at most craft stores)


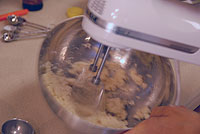
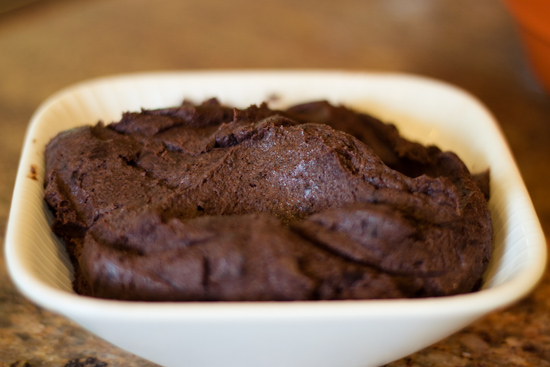
Step 1. Make a batch of cake pop batter using steps 1-4 from my previous Spring Flower Cake Pop tutorial (only use chocolate cake mix instead).


Step 2. Line a large baking sheet with wax paper. Then, form the mixture into small round balls about 1-1/2" - 2" in diameter. Then squish them down so the tops are fairly flat. Let the cake ball forms sit in the freezer until they firm up (either a few hours or overnight).
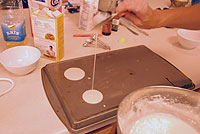
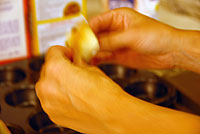
Step 3.  Press your 1" diameter cookie cutter into your cake pop forms and trim away excess batter with your fingers. (tip: if you coat the inside and outside of your cookie cutter with shortening it will cut through the cake pop batter easier).


 Step 4. Place mini cake forms on a baking sheet lined with wax paper. Place a little shortening on your finger tips and smooth out the tops and sides of your mini cakes.

Step 5. Insert the Lollipop sticks into your mini cakes. Melt a small amount of the chocolate, place in a zip-lock bag, cut the tip of the bag, then pipe a ring around the top of the lollipop (where it meets the cake). Place in the freezer for about an hour.
For a more pictures, see step 10 of my Spring Flower Cake Pops.


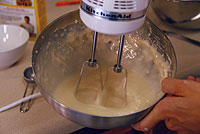
Step 6. Melt chocolate according to package directions. I like to melt mine in a tall/skinny cup in the microwave, the cup makes it easier to dip and uses less chocolate. Dip the mini cakes in the melted chocolate  (take out of the freezer 1 at a time to help keep firm), making sure to cover the cakes completely.


*Tap the lollipop stick against the cup very lightly to help remove excess chocolate.


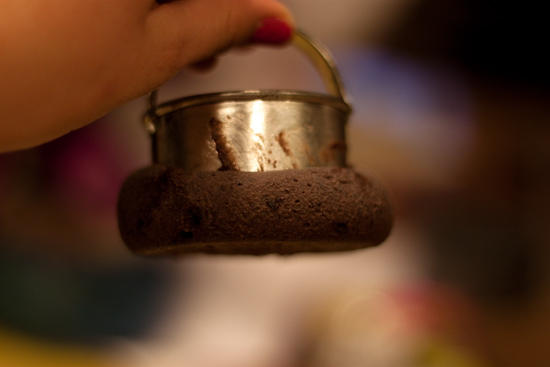
Step 7. Place the mini cakes upright by pressing the bottoms of the lollipop sticks into a block of styrofoam and let the chocolate harden completely.

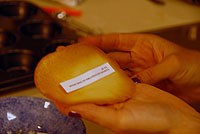
Step 8. Using a #3 frosting tip and buttercream frosting, pipe a mini boarder around the top and bottom of the mini cakes.


Step 9. Using the same frosting tip, pipe the words "cake" on the top of the mini cakes. (You don't have to do this, I just got a little nervous that people wouldn't know what the cakes pops were suppose to be, and then I decided it was kind of cute :)

Step 10. If you would like to use the foam block to display your cake pops, you can cover the top with doilies or lace fabric. Then just stick the lollipops through the holes in the lacing. I also placed my foam block on a small platter.

Keep cake pops in the fridge or a cool place until ready to serve. Then enjoy!


ENJOY!